Sunday 5 July 2015

Crafting in the Garden Summer Evening

Garden tea light holders

Our recent craft night was held in the garden of one of our
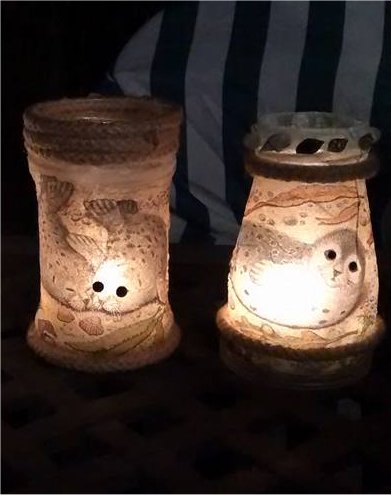
members. The theme was garden ornaments. Using old jars turning them into pretty night time candle holders. There are some nice shaped glass jars than can be recycled. To make the candle holders you will need a jar that is not too deep so the candle will burn ok with a wide opening at the top.
Using napkins for decoration for these let the light through better. If you use card it will cut a lot of the light out and not look so effective.
Using mod podge or thinned pva glue cover the jar all around leaving the base clear. Peel the napkin so it has at least 2 layers the picture and an extra layer. You can use it as it is if you would like to see more of your napkin once the candle is in use.
Smooth the napkin onto the jar being careful not to tear it.  You can trim the napkin to fit the jar. Then when napkin is dry mod podge over the top to glaze or use a thinner coating of pva glue.
You can now decorate with braid or rope top and bottom to hide any rough edges. Using mesh you can attach and add some shells this will give the project that summer feel and everyone loves the beach and shells. you can also add a bit of sand at the base inside the jar dampen with thinned pva glue this will give the candle a good firm base and stop is sliding too much.
Once complete and your happy with your work and design light the tea light candle and drop into the jar unless you have a tea light holder that you can use to lower it into the jar. Your jar will keep alight to the length of the candle roughly around 2-3 hours. Just replace with a new candle when required. Your completed candle holders will look very effective should you have a bbq or just like to sit in the garden on a warm summer evening. You can purchase candles to prevent unwanted visitors that like to bite when its dark...lol....happy crafting


Sunday 21 June 2015

Hanging Gift Box


You will need 1 piece of A4 card to make this box. 300gsm is the best
Papers to decorate.
Embellishments.

With the 8 inch side at the top cut the card to 4 inches wide. Keep the remaining piece of card.
Using the 4" piece of card place the longest side to the top of the score board and score at 1/2" then at 1 1/2".
fold and burnish the score lines. put to one side
Using the piece of card you cut off cut the card to 7".


Then score across at 1/2" then 1 1/2" turn around and then score at other end at 1/2" and 1 1/2" the middle part should measure 4".
fold and burnish at the score lines.


Before we put the box together you will need to work out how long your box wants to be or hang down. You can shorten by cutting down at the top end of the back piece. You will also need to decide if you want to place a shaped hole for the box to hang. This can be done by using a die of your choice. Once done continue with putting the box together.


Take the back piece of card (longest) and where the 1/2" first fold is glue to the box piece of card where the gap of 4" ins.


You can now decorate the whole of the box before closing the sides or continue to the next step.

Glue each 1/2" flap on either side of the box front to the box back. Make sure you glue so the flaps do not show. Push a pencil down the sides of the box on the inside to help the glue to set.
Your box is now complete to use.


I hope this tutorial is easy to follow for you all Happy Crafting
Holly

Sunday 10 May 2015

Mini Easel Box Card with Drawer and gift box

Made this little gift card for a friends 18th Birthday. The box has a little drawer for which you can put a small gift, not shown in the photo but I made a mini bottle with charms. It all lays flat and fits neatly into its own gift box.

Made from Centura card A4 from crafters companion, this is a 300gsm card and has a beautiful sheen to it. Covered with Santoro paper from the A4 paper pack. The key is from a die by Marianne cut from thick black card and layered up I usually cut about 5 of them then glue together with PVA glue. Then distressed with Buff it Gold paint.
The size of the easel box is 3 x 3 inches perfect for posting and a keep sake.

Happy Crafting
Made by Holly

Thursday 7 May 2015

Spray inks and Rock Salt technique


I used numerous colours spraying randomly on 300gm watercolour paper,while wet I applied rock salt all over,then left to completely air dry,when dry, just brush the salt off ! so easy and so pretty :)

Little Sketch Book created by Pattie Bloomfield

Wednesday 6 May 2015

I'm in!

Still not creating but will be soon as my crafting cabinets are almost sorted....I really can't wait to get back to it and make a start on our book pages.
This is just a little something to check I'm posting correctly :)  Happy Blogging

A Larger version of the Tea Box

Instructions below on the smaller version

Altered Yorkshire Tea Box

ALTERED YORKSHIRE TEABAG BOX
Materials 
1box 
Tim Holtz distress ink,Walnut.
Centurian pearlised card (Hobbycraft or CC)
Bella Rosa paper pad 
UHU glue
Brown Promarker pen
Tim Holtz metal feet ( Hobbycraft or online shops)
Embellishments of your choice

Method
I first cut down the 4 sides of the box so it laid flat allowing me to cover completely with the Centurian card,so the whole box is a blank canvas on the outside.then covered the outside again completely with the Bella Rosa papers.edged with brown Pro marker.

Then proceeded to do the same inside the box.
If you wish to fix tags or pages inside its a bit more complecated,I measured a piece of paper to fit the inside left of the box and concertina,d it this I stuck down leaving pockets for the pages to fit in ( see Pics) I glued them in.
The feet I used UHU glue to fix but you could use pins,I chose the easy way lol they are very firm .
I haven't put any measurements here as when you have the box in hand you will see how easy it is to simply measure,or you may decide to use a different box.
I am really pleased how sturdy this box turned out ! 

Made and Designed by Pattie Bloomfield